Nest.js is a Node.js API framework that includes a variety of built in tools for building robust services quickly.
In this tutorial, I’ll show you how you can create your own simple Nest.js API service to add, update, and delete Restaurant information. Afterwards, we’ll see how quickly we can host it using DigitalOcean’s App Platform.
Setup
First, let’s install Nest globally.
npm install -g nest
Create a new Nest project using the global Nest CLI tool.
nest new nest-digitalocean-app
After running, you should now have a boilerplate Nest project.
Creating the “restaurants” endpoint
Now, we are going to create the /restaurants endpoint with the following structure:
nest-digitalocean-app/
├─ src/
   ├─ restaurants/
      ├─ dto/
         ├─ create-restaurant.dto.ts
         ├─ update-restaurant.dto.ts
      ├─ restaurants.controller.ts
      ├─ restaurants.module.ts
      ├─ restaurants.service.ts
   ├─ ...
If you are new to Nest, this may look a bit daunting. Let’s break it down.
DTO
dto/ - A folder to contain our Data Transfer Objects. These files define the data structure of a request body, when creating and updating a restaurant record.
// src\restaurants\dto\create-restaurant.dto.ts
export class CreateRestaurantDto {
  name: string;
  description: string;
  rating: number;
}
Restaurants Controller
restaurants.controller.ts - The entry point for the /restaurntsendpoint. Defines the different HTTP methods and route structure.
// src\restaurants\restaurants.controller.ts
import {
  Controller,
  Get,
  Post,
  Body,
  Patch,
  Param,
  Delete,
} from '@nestjs/common';
import { RestaurantsService } from './restaurants.service';
import { CreateRestaurantDto } from './dto/create-restaurant.dto';
import { UpdateRestaurantDto } from './dto/update-restaurant.dto';

@Controller('restaurants')
export class RestaurantsController {
  constructor(private readonly restaurantsService: RestaurantsService) {}

  @Post()
  create(@Body() createRestaurantDto: CreateRestaurantDto) {
    return this.restaurantsService.create(createRestaurantDto);
  }

  @Get()
  findAll() {
    return this.restaurantsService.findAll();
  }

  @Get(':id')
  findOne(@Param('id') id: string) {
    return this.restaurantsService.findOne(+id);
  }

  @Patch(':id')
  update(
    @Param('id') id: string,
    @Body() updateRestaurantDto: UpdateRestaurantDto,
  ) {
    return this.restaurantsService.update(+id, updateRestaurantDto);
  }

  @Delete(':id')
  remove(@Param('id') id: string) {
    return this.restaurantsService.remove(+id);
  }
}
Restaurants Service
restaurants.service.ts - Provides the business logic for the routes defined in restaurants.controller.ts.
import { Injectable } from '@nestjs/common';
import { CreateRestaurantDto } from './dto/create-restaurant.dto';
import { UpdateRestaurantDto } from './dto/update-restaurant.dto';

@Injectable()
export class RestaurantsService {
  constructor() {}

  async create(createRestaurantDto: CreateRestaurantDto) {
// ...
  }

  async findAll() {
// ...
  }

  async findOne(id: number) {
// ...
  }

  async update(
    id: number,
    updateRestaurantDto: UpdateRestaurantDto,
  ) {
// ...
  }

  async remove(id: number) {
// ...
  }
}
Restaurants Module
restaurants.module.ts - Defines RestaurantsModule, which will be imported into app.module.ts. This will allow the Nest service to serve the /restaurants endpoint.
// src\restaurants\restaurants.module.ts
import { Module } from '@nestjs/common';
import { RestaurantsService } from './restaurants.service';
import { RestaurantsController } from './restaurants.controller';

@Module({
  controllers: [RestaurantsController],
  providers: [RestaurantsService],
})
export class RestaurantsModule {}
Connecting to a Postgres database
Of course, we need a way to persist the Restaurant data to a database of some sort.
Luckily, DigitalOcean’s App Platform offers the ability to create a “Dev Database”. Simply put, it is a small Postgres database that can be connected to one or more sources.
To enable our app to connect to the Dev Database, let’s first create a configuration file in our project to pull environment variables that will be loaded by the DO App Platform.
// src/config/configuration.ts
export default () => ({
  port: parseInt(process.env.PORT, 10) || 3000,
  database: {
    host: process.env.DB_HOST,
    port: parseInt(process.env.DB_PORT, 10),
    user: process.env.DB_USER,
    password: process.env.DB_PASS,
    db: process.env.DB_DATABASE,

// In order to ensure we can connect to the DigitalOcean managed// database, we need to ensure that we include the generated Root// CA for the database.ca: process.env.DB_CA_CERT,
  },
});
This configuration file can be imported via the ConfigModule.forRoot() method. We can then use Nest’s TypeOrmModule to load in the Postgres config info:
// src/app.module.ts
import { Module } from '@nestjs/common';
import { AppController } from './app.controller';
import { AppService } from './app.service';

import { ConfigModule, ConfigService } from '@nestjs/config';
import { RestaurantsModule } from './restaurants/restaurants.module';
import configuration from './config/configuration';
import { TypeOrmModule } from '@nestjs/typeorm';

@Module({
  imports: [
// Load the configutation file we madeConfigModule.forRoot({
      load: [configuration],
    }),

// Configure TypeORM to connect to the Postgres databaseTypeOrmModule.forRootAsync({
      imports: [ConfigModule],
      useFactory: async (configService: ConfigService) => ({
        type: 'postgres',
        host: configService.get<string>('database.host'),
        port: configService.get<number>('database.port'),
        username: configService.get<string>('database.user'),
        password: configService.get<string>('database.password'),
        database: configService.get<string>('database.db'),
        ssl: {
          ca: configService.get<string>('database.ca'),
        },
        synchronize: true,
      }),
      inject: [ConfigService],
    }),

// Let's import RestaurantsModule so that we serve the /restaurants endpointRestaurantsModule,
  ],
  controllers: [AppController],
  providers: [AppService],
})
export class AppModule {}
We can even grab the port number defined in the config file from the main.ts file.
// src\main.ts
import { ConfigService } from '@nestjs/config';
import { NestFactory } from '@nestjs/core';
import { AppModule } from './app.module';

async function bootstrap() {
  const app = await NestFactory.create(AppModule);

  const configService: ConfigService = app.get<ConfigService>('ConfigService');

  const port: number = configService.get<number>('port');
  await app.listen(port);
}
bootstrap();
Using TypeORM to persist data to Postgres
Now let’s create a TypeORM entity to define how the data needs to be saved to the Postgres database.
// src\restaurants\restaurant.entity.ts
import { Entity, Column, PrimaryGeneratedColumn } from 'typeorm';

@Entity()
export class Restaurant {
  @PrimaryGeneratedColumn()
  id: number;

  @Column()
  name: string;

  @Column()
  description: string;

  @Column()
  rating: number;
}
Now, we can update app.module.tsto include the new Restaurant entity.
// src\app.module.ts
import { Restaurant } from './restaurants/restaurant.entity';

...

TypeOrmModule.forRootAsync({
  imports: [ConfigModule],
  useFactory: async (configService: ConfigService) => ({
    type: 'postgres',
    host: configService.get<string>('database.host'),
    port: configService.get<number>('database.port'),
    username: configService.get<string>('database.user'),
    password: configService.get<string>('database.password'),
    database: configService.get<string>('database.db'),
    ssl: {
      ca: configService.get<string>('database.ca'),
    },

// Load the imported entity from aboveentities: [Restaurant],

    synchronize: true,
  }),
  inject: [ConfigService],
}),
Finally, let’s update the restaurants.service.ts file to find, add, update, and delete Restaurant records in the Postgres database.
import { Injectable } from '@nestjs/common';
import { CreateRestaurantDto } from './dto/create-restaurant.dto';
import { UpdateRestaurantDto } from './dto/update-restaurant.dto';
import { Restaurant } from './restaurant.entity';
import { InjectRepository } from '@nestjs/typeorm';
import { Repository } from 'typeorm';

@Injectable()
export class RestaurantsService {
  constructor(
    @InjectRepository(Restaurant)
    private restaurantRepository: Repository<Restaurant>,
  ) {}

  async create(createRestaurantDto: CreateRestaurantDto): Promise<Restaurant> {
    const restaurant = this.restaurantRepository.create(createRestaurantDto);

    return this.restaurantRepository.save(restaurant);
  }

  async findAll(): Promise<Restaurant[]> {
    return this.restaurantRepository.find();
  }

  async findOne(id: number): Promise<Restaurant> {
    return this.restaurantRepository.findOne(id);
  }

  async update(
    id: number,
    updateRestaurantDto: UpdateRestaurantDto,
  ): Promise<Restaurant> {
    const updateResult = await this.restaurantRepository.update(
      id,
      updateRestaurantDto,
    );

    if (updateResult.affected > 0) {
      return this.findOne(id);
    }
  }

  async remove(id: number) {
    const restaurant = await this.restaurantRepository.findOne(id);
    if (restaurant) {
      this.restaurantRepository.delete(id);
    }
  }
}
The full Nest API example GitHub repo can be found here.
Deploying the API
Now we are ready to deploy our app!
If you have a GitHub account, you can easily connect it to the DigitalOcean App Platform. Then, simply select which repo you want to use to create and launch the app.
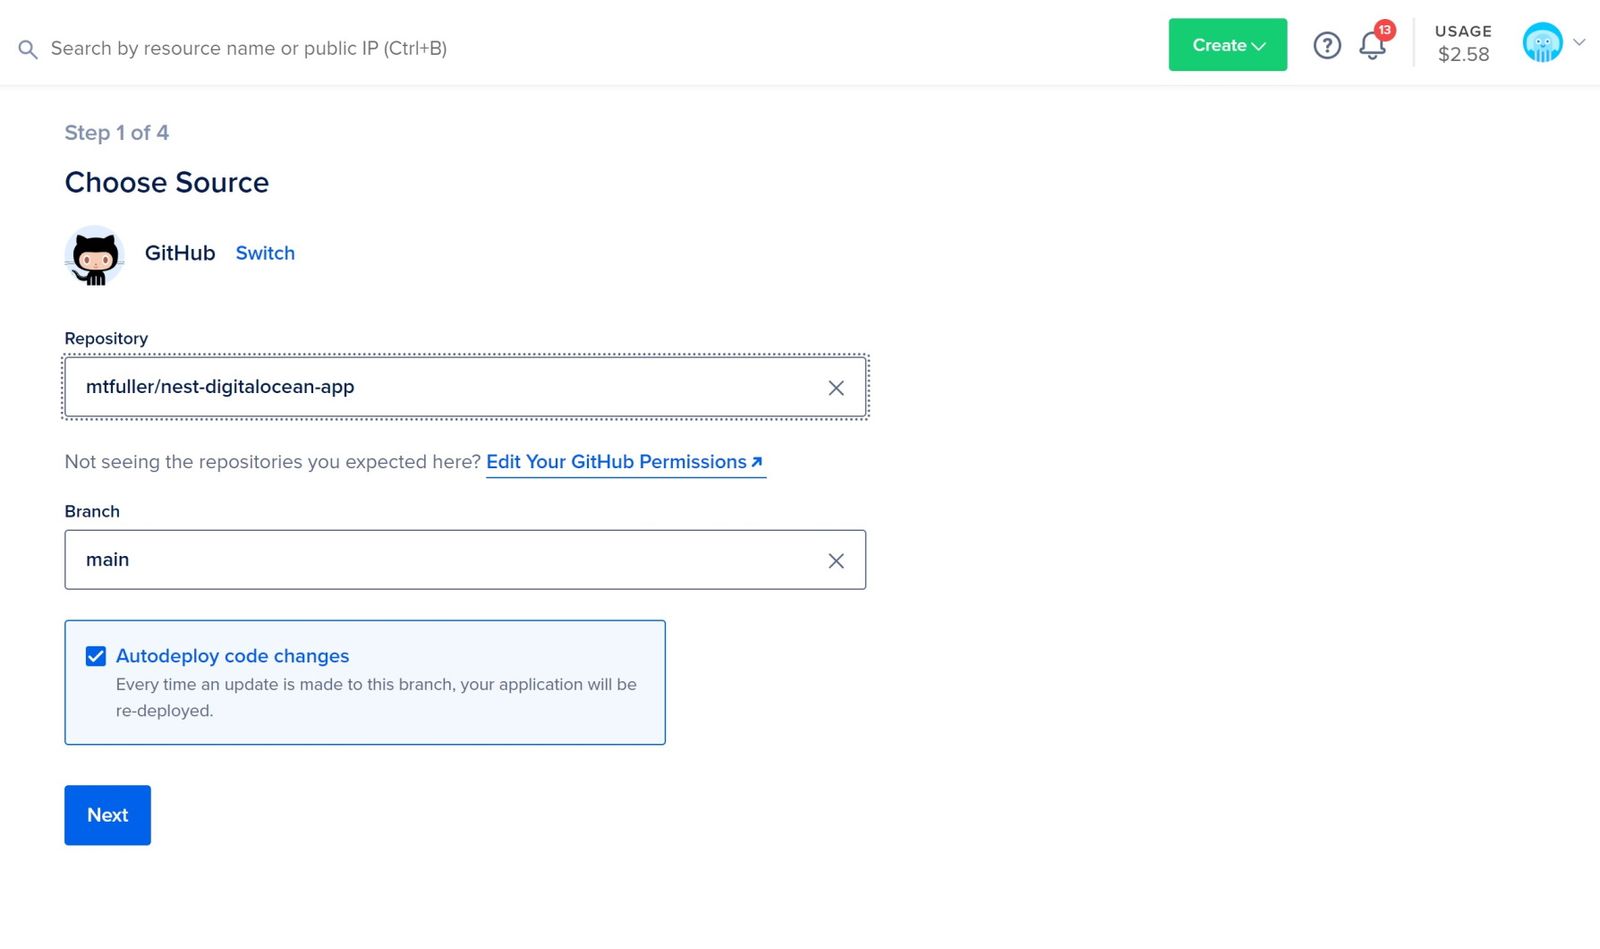
From here, you can configure your app’s HTTP routes, environment variables, run command, etc. following DigitalOcean’s App Platform How-To.
However, if you would like to quickly spin up this example to try it out, you can click the the “Deploy to DigitalOcean” button below.
